Mount Tyndall & Mount Williamson via Shepherd Pass

Day 1 (Hike in + Tyndall): 7/15/2018
Mileage: 17.4
Elevation Gain: 9,800′
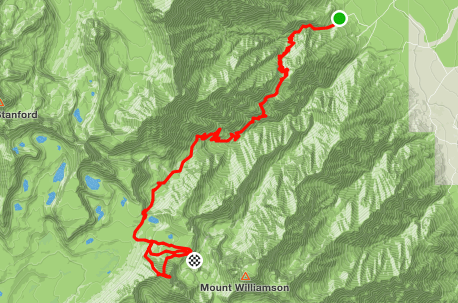
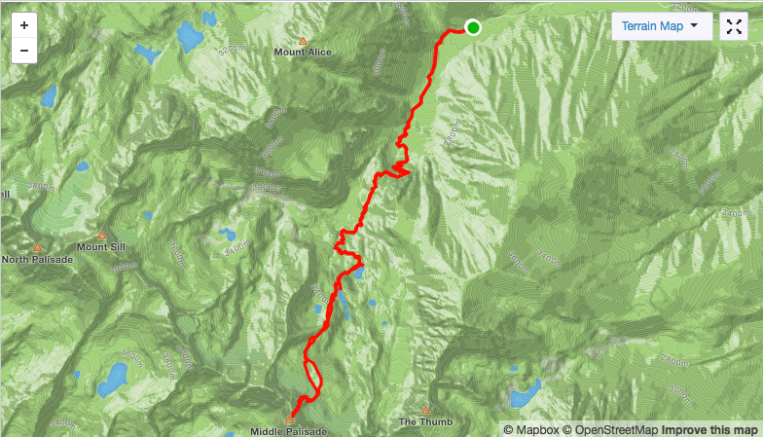
Strava Track:

Screen Shot 2018-07-27 at 7.55.32 PM

We arrived at the trailhead the evening of the 14th and car camped, knowing that we needed to start early the next day to  avoid hiking in the desert heat. This trailhead is another that starts pretty much at the valley floor. We woke up, put on our overnight packs, and got on the trail at 3:30. The trail quickly crosses Symmes Creek 4 times and then starts up 54 switchbacks through the forest. The sun came up right as we got to Symmes Saddle, an area where you begin a disheartening 500′ descent. The trail continues through scrub and sparse trees until finally reaching a forested area and Anvil Camp, where some people choose to stay overnight. We did not have this opportunity since this would be such a quick trip with a lot to accomplish. It was pretty buggy too, but also the last good place to fill up water for a while.

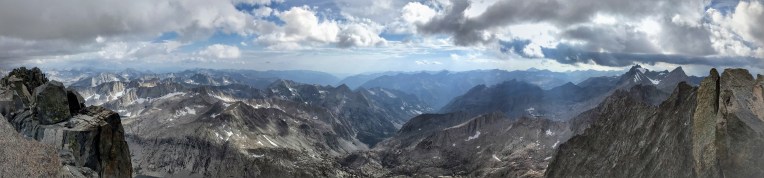
The trail breaks out of the trees and continues for quite a ways through rocks before Shepherd Pass comes into view, over 10 miles into the hike. During the record snow year of 2016-2017, a small herd of mule deer got stuck coming down the pass in a migration gone wrong and their rotting carcasses now litter the trail in a few places. I was slightly prepared for this, but it was really bad. There are a few further down, and then a bunch near the bottom of the switchbacks, possibly caught in an avalanche. It’s rancid. We hurried through this area and to the top of the pass. We entered into Sequoia/King’s Canyon and enjoyed the impressive view to the west. We then left the trail and turned left towards Williamson Bowl to set up camp.

IMG_9476

IMG_9494
The pile of carcasses 😦

IMG_9495

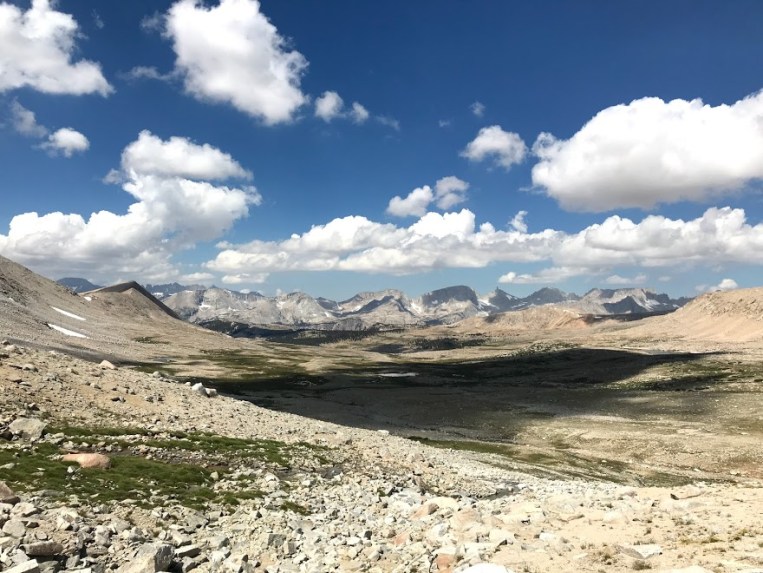
We took a not so efficient route towards where we assumed the bowl would open up, and followed a somewhat confusing talus hop down towards the ridge that goes through the center of the bowl. There are several gorgeous blue lakes in here, but you would have to descend quite a ways to camp near them so we found a few nice flat pads on rock slabs just below the left side of the ridge. We set up camp, tried to nap in the hot midday sun, and then decided it was time to go up Tyndall. We had originally planned on having two nights here so we wouldn’t have to do the approach hike and summit in the same day, but no such luck.

IMG_9477
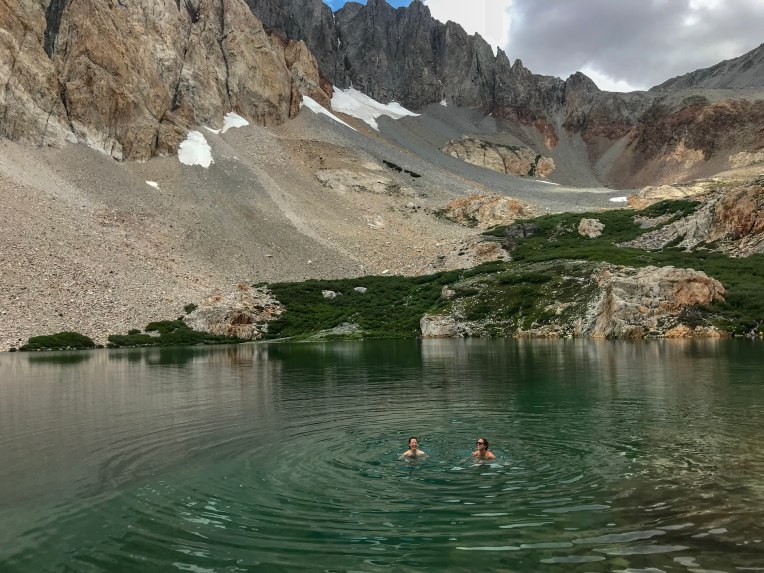
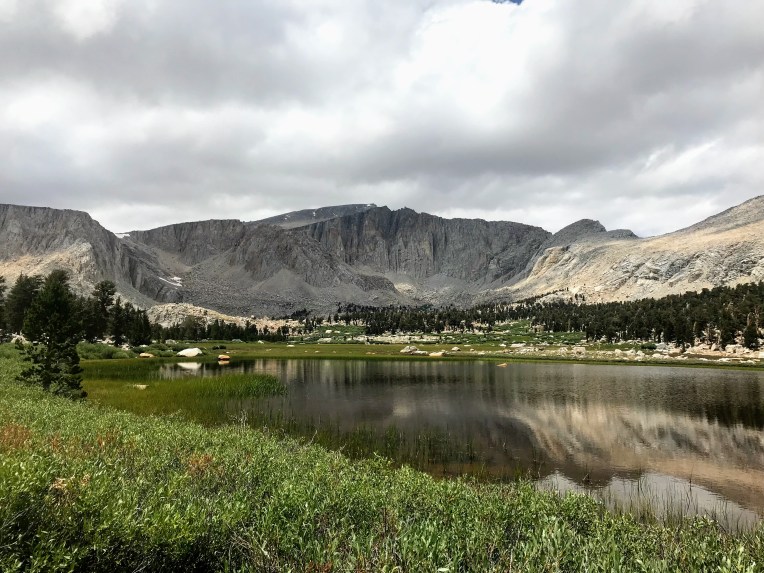
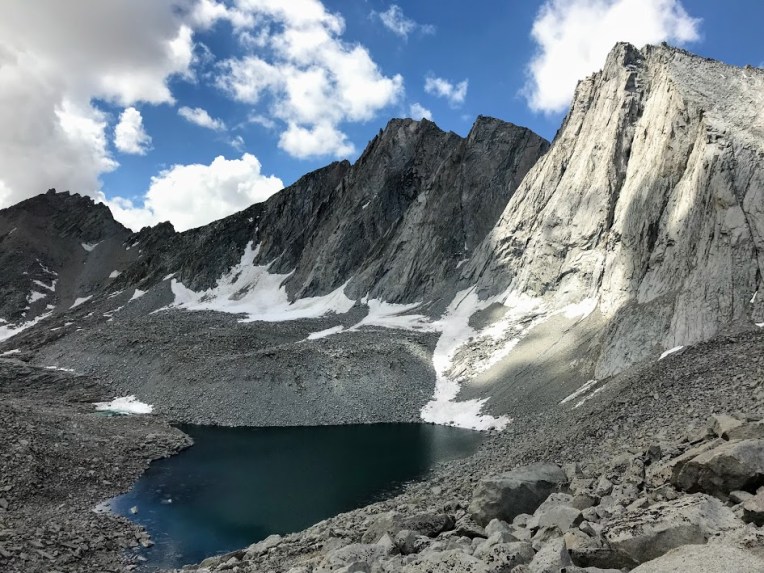
Mount Tyndall’s impressive north face above a crystal blue lake

I had a guidebook that recommended taking Mount Tyndall’s long northwest ridge, so we did. Do not do this. It is a waste of time and effort for nothing but talus and boulder hopping. The ascent took forever. We finally summited and we were exhausted! We looked over at hulking Mount Williamson and thought it looked unclimbable, but decided that we would reevaluate the next morning.

IMG_9478
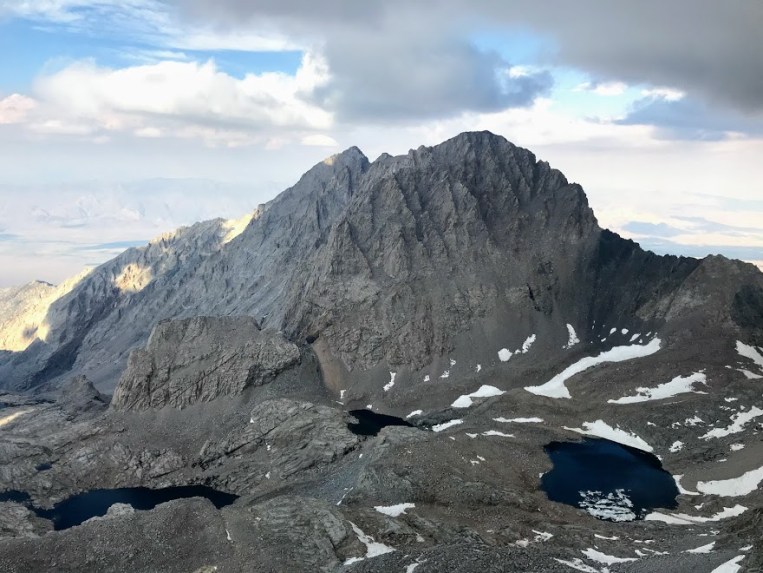
How the heck do you get up this beast?!

We descended down the obvious rock rib on the northeast face, which was fine. Easy class 3 with some tippy talus, but nothing that was too bad. We got back to camp just in time to watch an incredible sunset behind Tyndall, and as we ate dinner I saw a fiery green shooting star in the twilight sky. It was a nice end to a tough day. We went to bed and set the alarm for the next day’s climb.
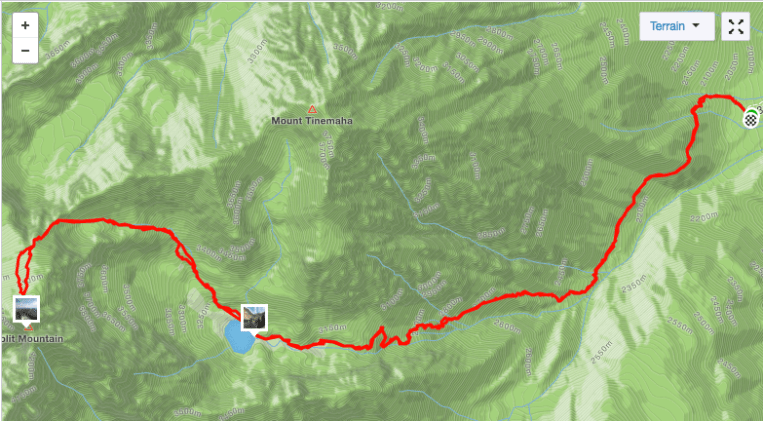
IMG_9659

Relive Topo/GPS

Day 2 (Williamson + hike out): 7/16/2018
Mileage: 16.2
Elevation Gain: 3,800′

Strava Track:

Screen Shot 2018-07-27 at 7.57.20 PM

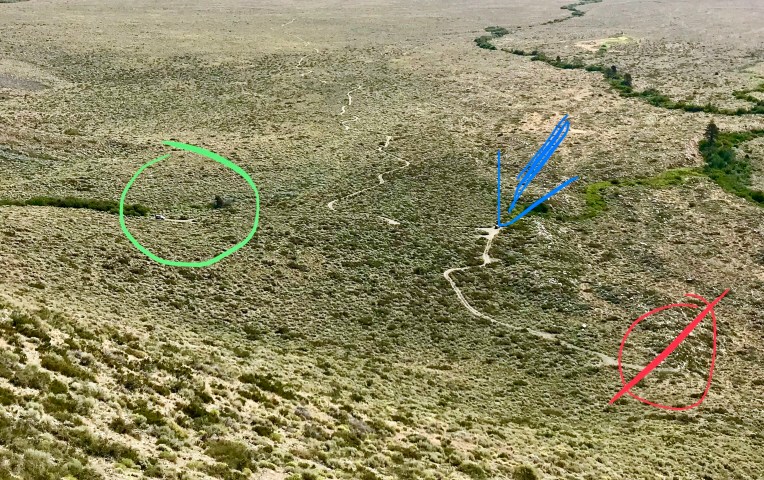
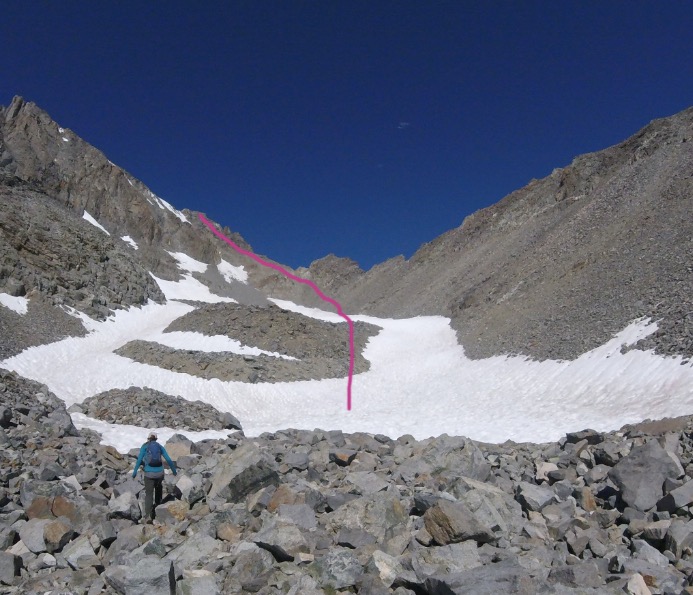
The alarm went off early, but we decided to snooze and await the sun. We were exhausted from the day before. We headed out at 6 and walked along the ridge crest through the Williamson Bowl. I don’t have a good photo of the route, since you can’t really see it from Tyndall or elsewhere in the Bowl. Follow occasional cairns through some ups and downs on a path of least resistance towards the base of Williamson’s massive west face. Do not try to cut up too soon or you will face a scree and talus nightmare. Once at the base, look up and see an area of rocks stained black from water. This is your approximate goal. Head up the talus, around and over the black stain, and up a gully that is the easiest way up the west face. There are cairns and signs of previous travel through here. It’s a bit loose in places but not too steep.

img_9729
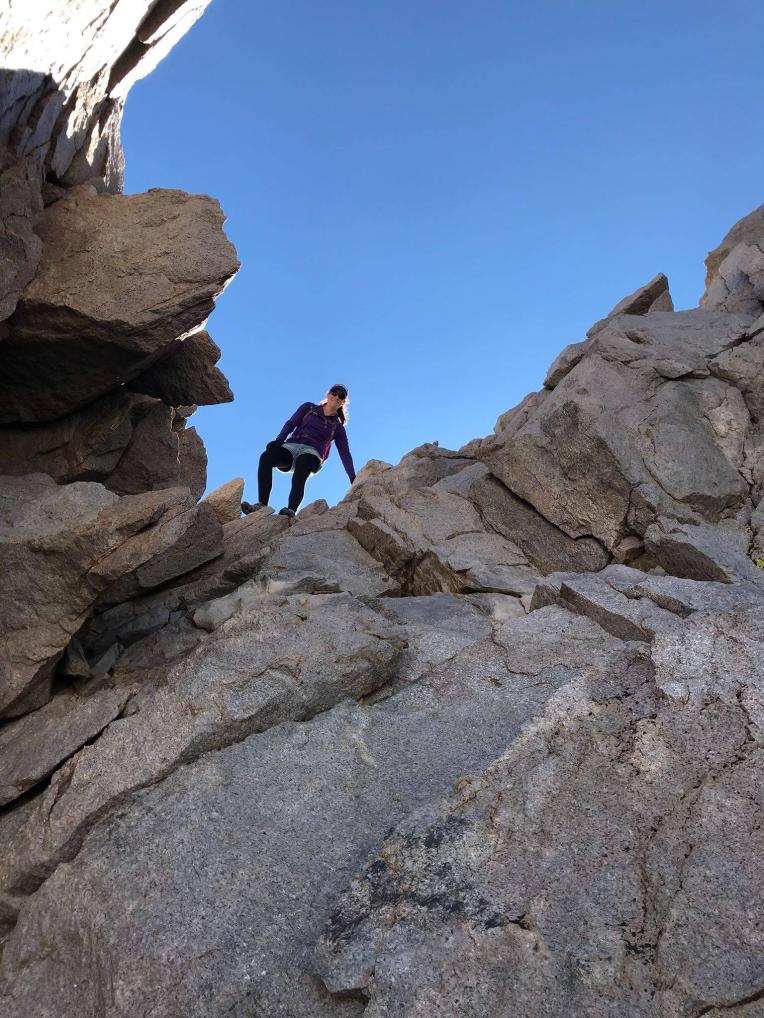
At the top of the chimney

Eventually you will reach the base of a chimney to the upper right. This is the crux of the climb. It’s definitely California class 3! Work your way up the chimney on good, featured granite and then top out on the left. Here you will see a plateau the size of a football field with Williamson’s sub summit to the east. Walk along the right side of the plateau and rock hop up the right onto the summit ridge. Take in the views and marvel at how small Mount Tyndall looks from its 14,375′ neighbor!


IMG_9486
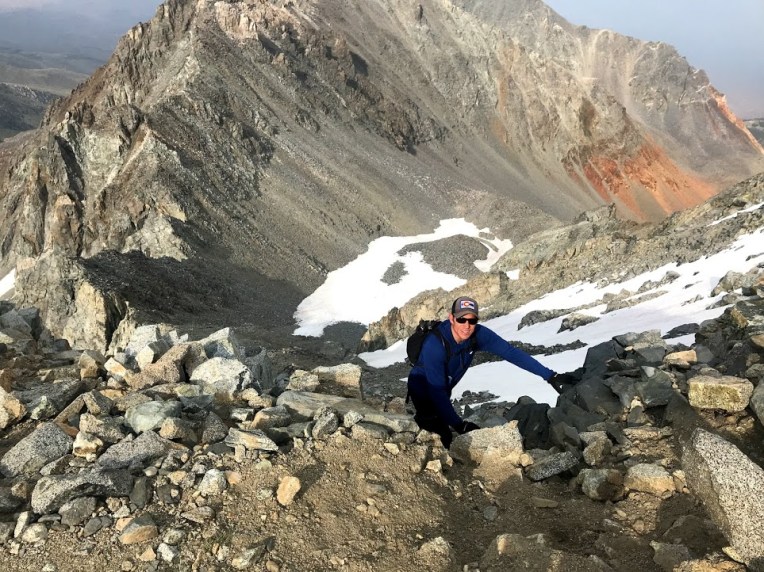
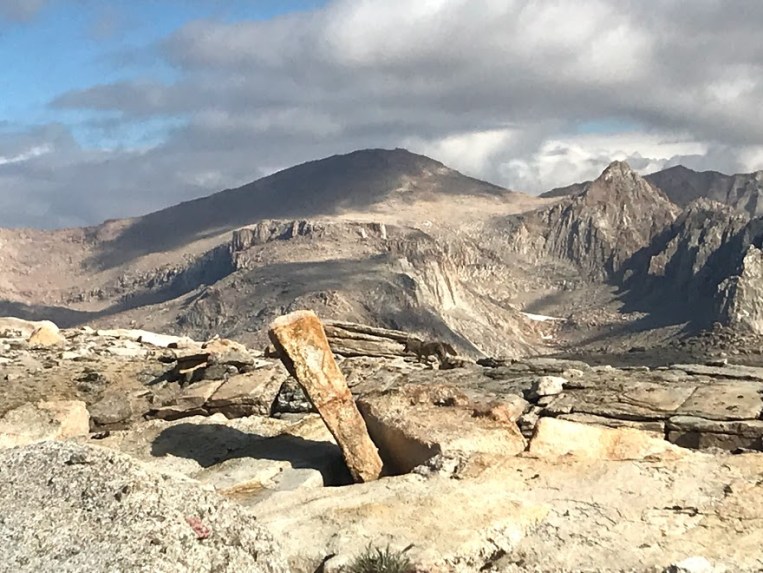
Tiny Tyndall and much of the route seen from the summit

IMG_9500
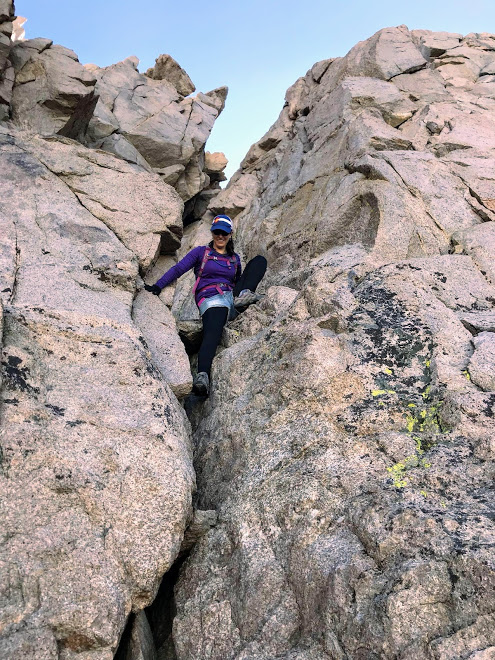
Descending the chimney

It was a beautiful sunny day and we enjoyed hanging out on the summit for a while before descending. We made pretty quick work of the gully on the way down, got back to camp, broke down, and hiked out. We took a more efficient way out to Shepherd Pass, hurried past the deer, and labored up the 500′ to Symmes Saddle. It felt good to be past that in the afternoon heat. We got through the 54 switchbacks, crossed the creek, and couldn’t have been happier when we saw the car at 5:30. This is not a trip for the faint of heart, and I would definitely recommend doing it over 3 days if you have the time. We had another motel room for the night, so we raced down to Lone Pine and had a fabulous dinner at Merry Go Round and tended to our blisters before bed. We had another full rest day the next day, which we would need to recover and get ready for our final endeavor of the trip – Whitney and Muir.

Relive Topo/GPS

Mount Langley

Date: 7/13/2018
Mileage: 22.6
Elevation Gain: 4,950′

Strava Track:
Screen Shot 2018-07-27 at 7.54.24 PM

We drove up to the Cottonwood Lakes/Mt. Langley trailhead on the evening of July 12. There are a number of tent sites, vault toilets, and quite a bit of parking. It seemed a little busy so we continued up the road to Horseshoe Meadows, which has more tent sites for $6 a night. We found a nice one and retreated to the car as a heavy thunderstorm passed over the area. It poured rain for about 30 minutes, let up, started again for about 10 more, and then finally cleared. It seemed like most of the other campers were also hiking or climbing, so after we ate dinner and it got dark it was pretty quiet. We set the alarm for 4 so we could get started right at 5.

We awoke to clear skies, packed up the car and drove to the trailhead. We got feet on the ground at 4:59am. The trail is excellent, easy to follow, and never steep. It goes through a gravely area with old dead trees, pine forest as it flanks a creek, and then turns to the west and splits to New Army Pass (to the left) and Old Army Pass (to the right) with gorgeous meadows and numerous lakes. We opted to take New Army Pass, since we had heard conflicting information about the conditions and safety of Old Army. Once up and over a small bump, one of the larger lakes and Langley’s impressive south face come into view. It’s a great place to take a break and get some photos. The trail continues on past interesting rock features, bristlecone pines, and more tarns as it climbs past timberline.

img_9412

The trail up to New Army Pass is excellent. It consists of gentle, uniform switchbacks. We got to the top, saw the rest of the route (there is still quite a bit!), and took another small break. There were numerous marmots sounding the alarm, and with good reason – two coyotes gained the ridge from the other side! I had never seen a coyote up so high before. The trail meanders across a broad plateau, and we saw where the trail met up with Old Army Pass. We ran into two guys who said they had come up New and were going down Old, and we decided that would be a good plan since it would save us about a mile.

IMG_9398Spot the coyote!

We followed the obvious trail to the north and got to the base of Langley’s summit plateau. It is still a ways away. We followed large cairns through mostly gravel trail and a bit of rock hopping as we gradually made our way up. You really aren’t there until you’re there! By this point, clouds and fog had descended on the area, but we were keeping an eye out for signs of electricity. The large cairns continue on the broad plateau and we finally reached the summit. At this point the summit was completely socked in, which is disappointing considering that I could tell that the drop off to the north and view of neighboring peaks Muir, Whitney, and Russell would be dramatic. We took some photos and it began to lightly graupel as we began our descent. We got to the trail junction and started down Old Army Pass.

IMG_5260
Those views! 👌🏼 😩

The trail is not maintained, and there is a persistent snowfield across part of it, but it’s pretty easily avoidable. There are much more eroded trails on some of Colorado’s 14ers, so if you’ve done a fair bit of hiking you’ll be fine. We continued down the switchbacks, enjoying the great close up view of Langley’s south face and one of the larger Cottonwood lakes below. Once off the switchbacks, the trail returns to easy dirt and gravel. It goes past more bristlecone and alpine meadows.

Descending the switchbacks, and looking back up at Old Army

I’m really glad we did this semi loop because both sides have their own beauty. The sun came out as we hiked out and we took a last look at Langley before descending back into the forest. Before too long, we met up with the main trail and slogged out. It was a long day and we were originally going to backpack in, but due to the fire changing our plans we needed to do it as a day hike. I’m glad, because those trail miles go really quickly. We clocked 22.6 miles in just over 10 hours. However, the area is absolutely incredible and I would love to return to spend some more time there and do a repeat of Langley so I could enjoy the summit views!

We got back to the car and drove to Bishop for our first night in a motel for almost a week. Showers, sushi dinner for Sommer’s birthday, and beds were a nice change of pace. The next day was a full rest day, so we picked up permits, soaked in the hot springs, and then drove out to the Shepherd Pass trailhead to camp the night before our next big adventure – Williamson and Tyndall.

Relive 3D Topo/GPS:

Middle Palisade – NE Face via Brainerd Lake

Date: 7/11/2018
Mileage: 16.1
Elevation Gain: 7,400

Strava Track:

Screen Shot 2018-07-27 at 7.52.36 PM

After getting our asses kicked on Split Mountain, we discovered that the fire we had observed over the last two days had closed access to not only the Whitney Portal area, but also Shepherd Pass, the location of our next objective. We went into Bishop and looked at my woefully inadequate guidebook to see if there was a different peak we could work in instead. We settled on Middle Palisade, which can be accessed from the east via the Glacier Lodge/South Fork of Big Pine Creek trail.

img_9342
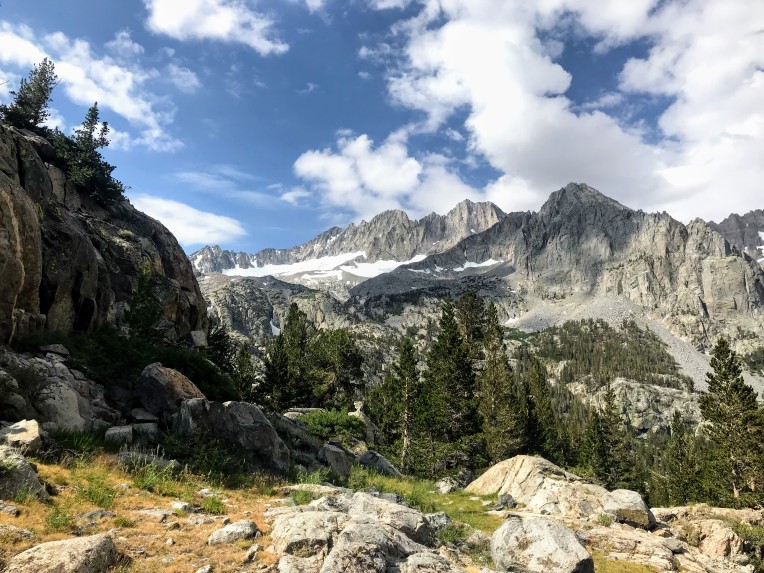
Middle Pal and Norman Clyde from the trail

We got on the trail just before 7 and were immediately impressed with the well maintained, well marked trail. We were making excellent time compared to our previous approach! This enthusiasm was short-lived. Less than 2 miles in, we reached a creek crossing. There was no bridge, no log, and no place to cross that was shallower than hip deep, rushing water. All three of us being of short stature quickly decided that wading across would not be safe. We went up and down the side of the creek and bashed through thick willows looking for any rocks, logs, or shallow areas while being eaten alive by mosquitoes. Finally we went 100 yards or so to the right of the trail and found a series of shallower areas with branches that allowed for an adventurous and foot soaking crossing. We rejoined the trail and continued on our way.


Switchbacks lead up and over a headwall and pass, then the trail descends into an area best described as ‘mosquito apocalypse’. This is a lush area near the junction of the Brainerd Lake trail and the trail to Willow Lake, which was allegedly even worse for mosquitoes. We tried to hurry through the area while also being confused about our mileage. We were using an AllTrails track that said the hike to Brainerd Lake is 7.4 miles round trip, so when we had hiked over 3.7 miles we knew that wasn’t the case. Do NOT trust California route descriptions!


We arrived at the lake at about 10. The lake is 5 miles from the trailhead. It is also just as much of a mosquito apocalypse as the lower section. Not knowing any better, we set up our tents in a not so great site and retreated a while for a rest and break from being devoured. It looked like it was going to storm again, but instead it just got very hot. We stupidly decided to make another afternoon summit bid. It was about 1pm and we decided we’d rather have to only hike out in the morning, so we headed for Middle Pal.


img_93451
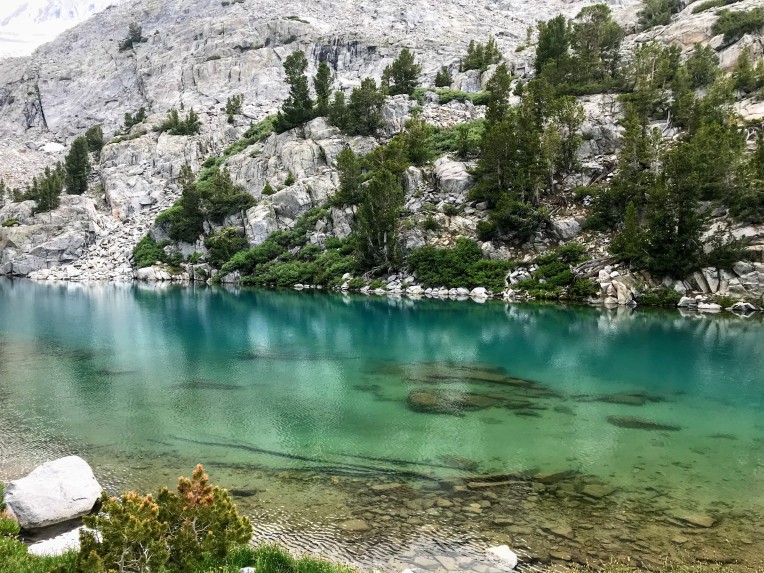
Gorgeous blue water in Finger Lake

There is a cairned trail at the NW end of the lake that takes you up to Finger Lake, which is gorgeous and has many far better campsites. It also seemed less buggy. So I would definitely recommend taking the extra few minutes to get above Brainerd. The trail will take you to the end of the lake on the left side; cross to the right over some boulders at the lake’s outflow to begin ascending towards the glacier. Follow cairns as you continue south over a higher, rocky area. Aim for the cleft between the Palisade and Middle Palisade glaciers. You will now see the east face of Middle Pal.

img_9733
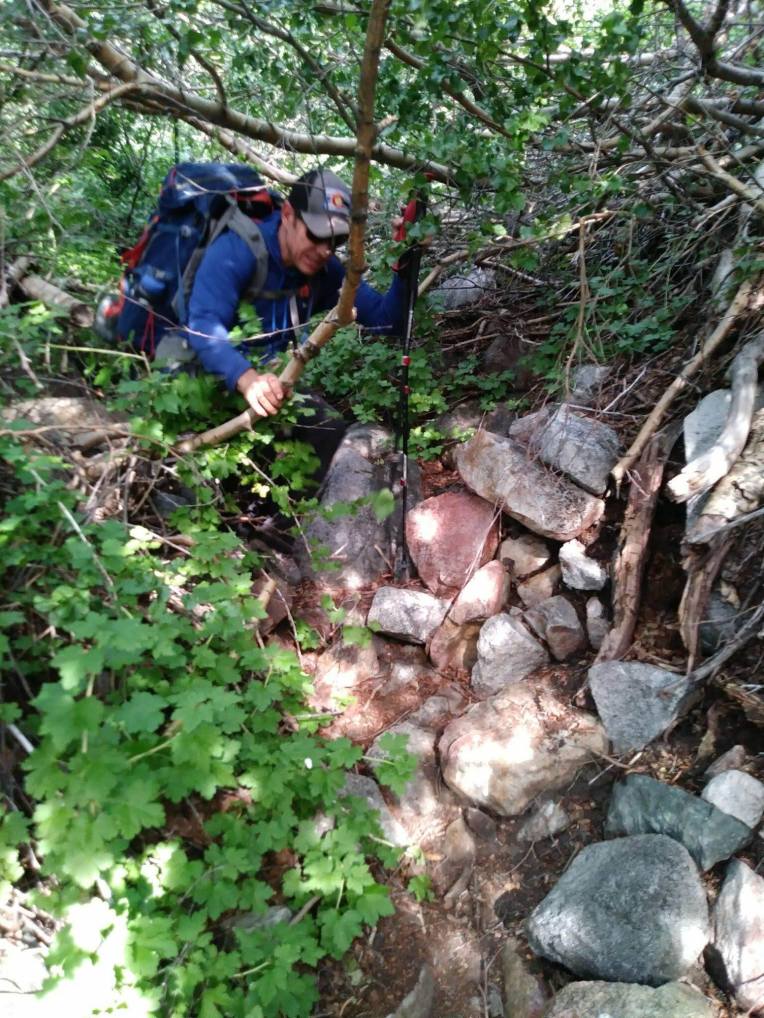
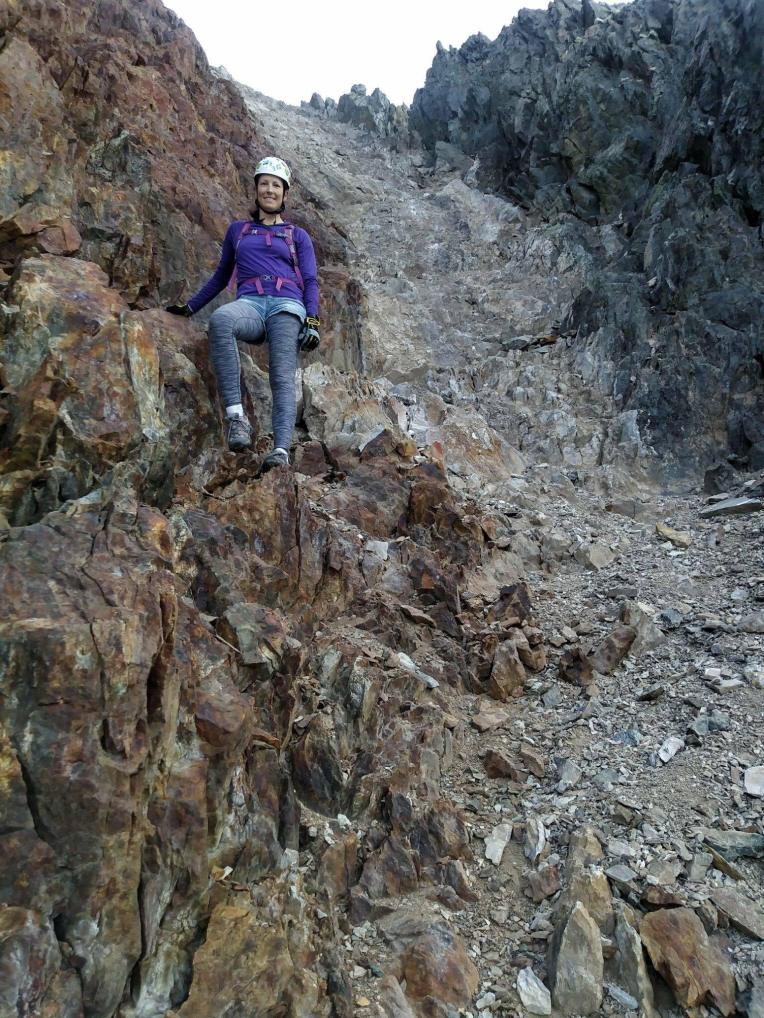
Near the entrance to the gully

Supposedly there is an entrance to the class 3 east face here, but we had a photo that was taken from Thunderbolt Peak and not the top of the Middle Palisade glacier, making it difficult to discern rock features relative to snow level, etc. We saw a line up a gully of red and white crumbly rock, which then led up to the left to more solid rock and a good ledge system. The climb up the face/gully is long but not bad and not super exposed. In retrospect, I’m not 100% sure it wasn’t the east face. Either way, we continued up a pretty obvious route and topped out just below the summit block. We went around the left side and scrambled up large blocks to the summit.

img_9359-pano

The Palisades are truly breathtaking. I had seen them from a distance from the JMT and from the approach, but their small, dramatic summits are best appreciated from up close. We spent a few minutes enjoying the views and then headed down. The descent down the face wasn’t as bad as expected, and once back on the glacier we made quick work of the sun cupped snow. We found the cairned route through the boulders, past Finger Lake, and back towards camp as darkness fell. We fell asleep quickly.

The hike out was uneventful although the mosquitos seemed much worse than the day before. Knowing the way across the creek, we got through much more quickly. We enjoyed the easy hiking on good trail and were back to the car in no time. We drove back into the valley, went for a soak in the hot springs, and then headed up to Horseshoe Meadows to get some rest for the next day’s objective, Mount Langley.

Relive 3D Topo/GPS


Split Mountain via Red Lake

Date: 7/9/2018
Mileage: 12.7
Elevation Gain: 7,725′

Strava track:

Screen Shot 2018-07-27 at 7.51.23 PM

After getting our permit at the White Mountain ranger station in Bishop, we followed the mostly accurate directions to the trailhead that we received from the ranger. We were told that as of summer 2017, part of the road had been completely washed out by a creek from heavy snowmelt about 4 miles from the trailhead, but there “might” be a culvert. The dirt road was a little bumpy and rutted at times, but our Toyota Rav4 did fine just being careful in a few spots Any vehicle with comparable or greater clearance can do it. Fortunately, the dreaded creek crossing had indeed been repaired and a culvert placed, so we were able to drive all the way to the trailhead. This is where the USFS’ directions are no longer helpful.

There is a parking area with a trailhead sign/kiosk near the entrance of the canyon you will be hiking up, but this is not the actual trailhead. There is a very rutted out “road” that goes south towards the canyon and a social trail at the end of it, but this is NOT the trail! Turn around and walk to the north up a spur road that dead ends where the trail begins. The trail in this area switches back through sand and brush. You may lose it at times, but it reappears as you work your way up the hillside. Finally it rounds the shoulder and into the canyon.

IMG_9260

The hike to Red Lake basically begins at the valley floor, in desert scrubland. It is VERY hot and dusty, and there is absolutely no shade. A very early start is recommended. This is the hike where we started using the term “Sierra mile,” because there was no way we had only hiked a mile and a half so far!?

Continue to contour along the north side of the canyon on the increasingly overgrown trail. There is steep dirt, bushwhacking, and lots of elevation gain as the trail gradually turns toward the northwest.

IMG_9737
Yep, that’s the “trail” here

The landscape eventually transitions from scrubland to subalpine and the trail moderately improves. Ascend a headwall through bristlecone pines and then follow trail segments as you continue northwest past a lake on your left. Occasional cairns through boulders will get you to the spectacular Red Lake, which has several very nice campsites. According to my Strava, the lake is 4.4 miles from the trailhead. The lake is great for a cold, refreshing swim as a reward for the hot, dusty hike in.

Snapseed (25)

We set up camp and went for a dip as some dark clouds came in. We retreated to our tents and napped as a few heavy thunderstorms moved through the area. The storms subsided and, thinking the rest of the climb would be much shorter than it actually was, started heading for the summit around 3.

Hike around the lake towards the inflow. Your eventual goal is just left of the lowest point on the saddle between Split and Prater. Follow trail segments and occasional cairns through grass and talus as you hike due west.

IMG_9252
Looking back on the route above the lake

We encountered a large, soft snowfield here and ascended climber’s right of the rocks through the center. Scramble up boulders and scree above the snow and head towards the obvious U-notch, but turn left just before it and continue up and to the left. img_9889
Photo courtesy of Mark Nolan

IMG_9245
Erik topping out on the saddle, with the snowfield below

Now the rest of the route is mostly in view. Work your way up tedious talus and before too long, you can enjoy what may be one of the best summit views to be had in the area. We summited just before 7 and knew we would be getting back to camp in the dark, but the scenery was well worth a short break to take photos and take in the dramatic surrounding peaks.

DSC03338
A smoky view from the summit

We descended the way we came, made it back to camp just after 9, and had dinner. We awoke early the next morning, took a few final photos of Red Lake, and left around 8 to try to beat the desert heat on the way out. We did not. This was a tough one! Next up, Middle Palisade.

Relive 3D Topo & GPS:


CA 14ers Road Trip: White Mountain Peak

From July 8 – 19, my two partners and I drove from Denver to the Owens Valley area to do a 14ers bender of 8 peaks in 12 days. That journey began on White Mountain Peak, a desert peak not far from the Nevada border.

Date: 7/8/2018
Mileage: 14.9
Elevation Gain: 3,205′

White Mountain Peak (14,246) is by far the least difficult of the California 14ers, and it made for a nice warmup for the unknown horrors that would await us in the Eastern Sierra over the following days. It is accessed via a long washboard dirt road that goes through the Ancient Bristlecone Pine Forest area. We arrived at the trailhead just before 11pm after driving since 5am. There were 8-10 other vehicles at the trailhead, but we had plenty of room to throw down a tent and crash for our early wake up.

We got on the trail (which is a dirt road the entire way) just after 5 and made pretty good time up the gentle grade past the Barcroft research station and observatory. From here, the summit comes into view. It’s still a ways away, but it’s all just easy road walking.

IMG_9886

We summited around 9:30, hung out and took photos for a while, and started our descent at 10:00. We got back to the car right about 12:30. If you’re looking for a much more detailed route description and photos, look here.

Strava track:

Screen Shot 2018-07-27 at 7.58.00 PM

The drive out was MUCH more interesting in the daylight; the bristlecone pine forest really is a thing of beauty. It’s completely different from any landscape in Colorado! We continued out of the area and into Bishop to pick up our permits for our next objective, Split Mountain.

Relive 3D Topo/GPS: